Encrypting Your Emails with Mailvelope
Introduction
Security and confidentiality are indispensable in digital communication. PGP encryption provides one of the most reliable methods to protect emails from unauthorized access. At the same time, this technique is not entirely self-explanatory — it requires some understanding of how to handle keys and encryption processes.
To make getting started easier, we have integrated the Mailvelope browser add-on directly and seamlessly. This allows you to create and receive encrypted messages much more easily, without additional complicated steps.
A basic introduction to the topic can be found here: Email Encryption with PGP.
Additionally, we recommend the Mailvelope FAQs to familiarize yourself with the most important questions and use cases.
The Mailvelope Setup Assistant
To ensure encryption works smoothly, the Mailvelope Setup Assistant automatically opens when reading or writing encrypted messages, if any additional steps are required. The following points are checked in sequence:
-
Installation of the Mailvelope Add-On.
Has the Mailvelope add-on already been installed for your browser?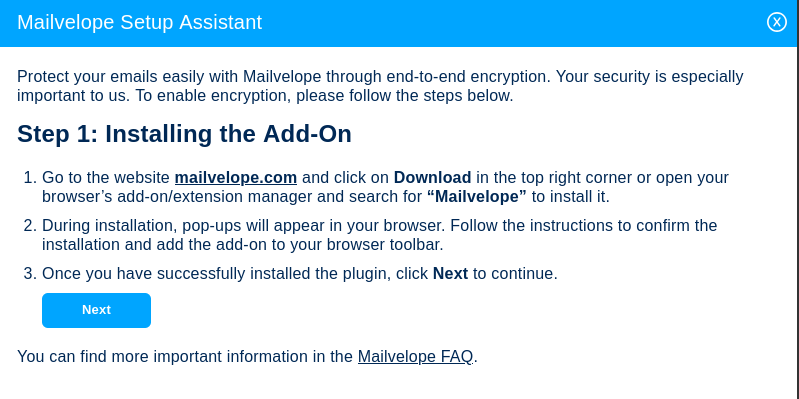
-
Domain Authorization.
Is mail.ch listed among the authorized domains?
Note: Manually adding our domain in the add-on is only necessary for older versions of Mailvelope. We recommend updating the add-on to simplify the process for you.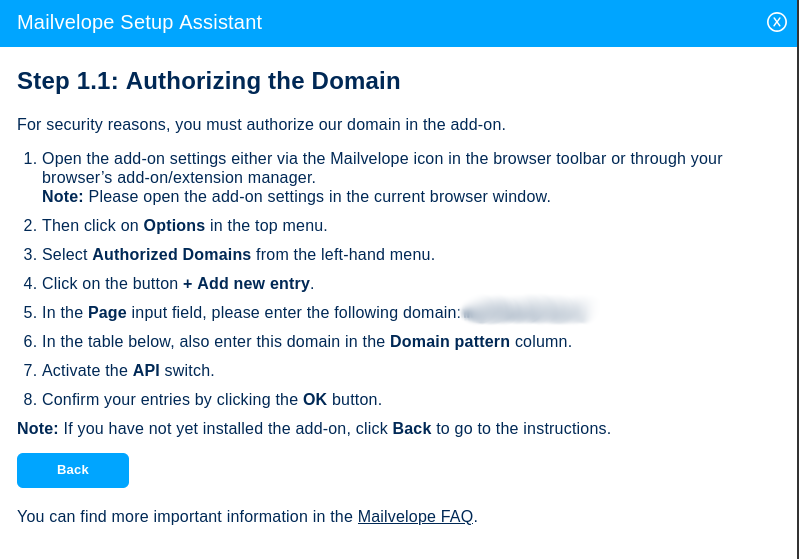
-
Existence of a private key for your sender address.
Have you already set up a PGP key for your mail.ch sender address in an external email client?
Note: In this case, close the setup assistant, manually import the existing key into Mailvelope, and restart the process. The assistant should then no longer appear, and your encrypted content can be decrypted directly through Mailvelope.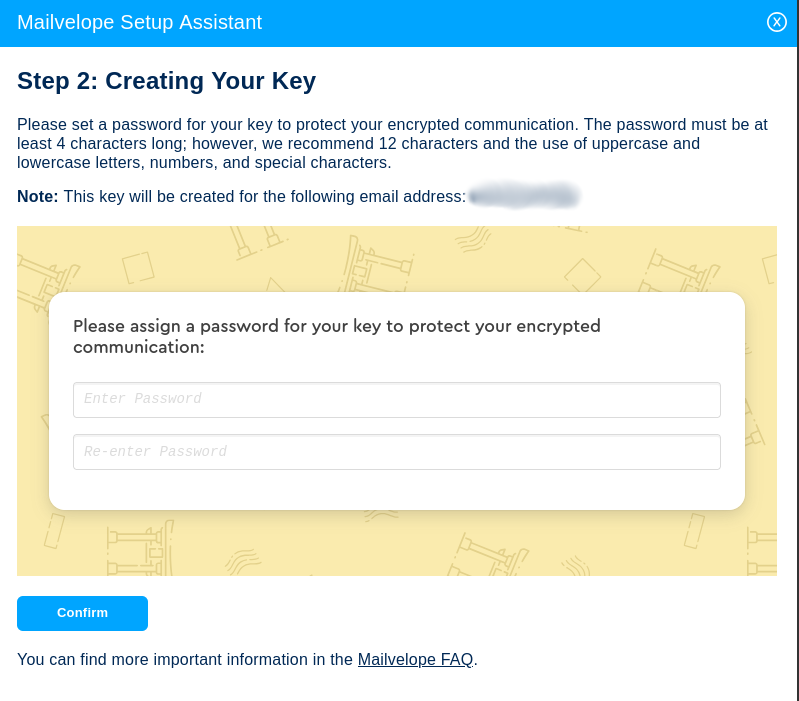
-
Restoring an existing key.
Is there a backup of a previously created private key — for example, on another device or in another browser? If yes, we provide the option to restore it so that older encrypted content can still be opened without issues.
Note: If you cannot locate your recovery key, you can instead create a new key for your sender address. Please note that content encrypted exclusively with the previous key will no longer be decryptable.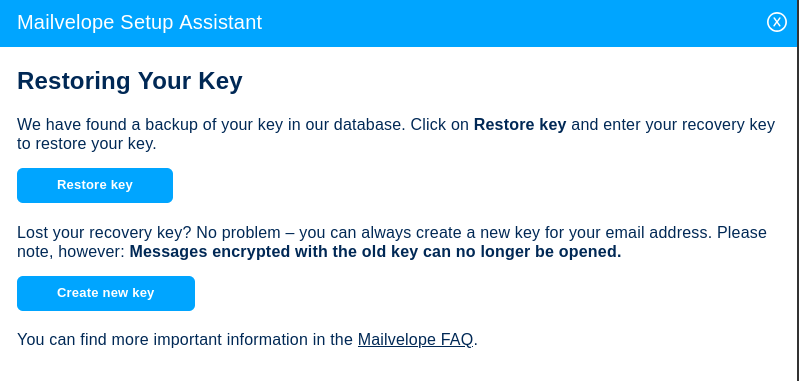
Once all the above checks are successfully completed, the setup assistant will no longer appear. From that point on, you can comfortably and securely receive and send your emails encrypted.
Composing an Encrypted Email
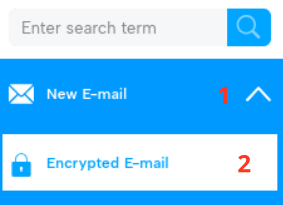
To send an encrypted message, click at the top left next to "New E-mail (1)" on the dropdown menu (2) and select "Encrypted E-mail". A new window will open to compose your encrypted message. The tab of the newly opened window is marked with an encryption icon.
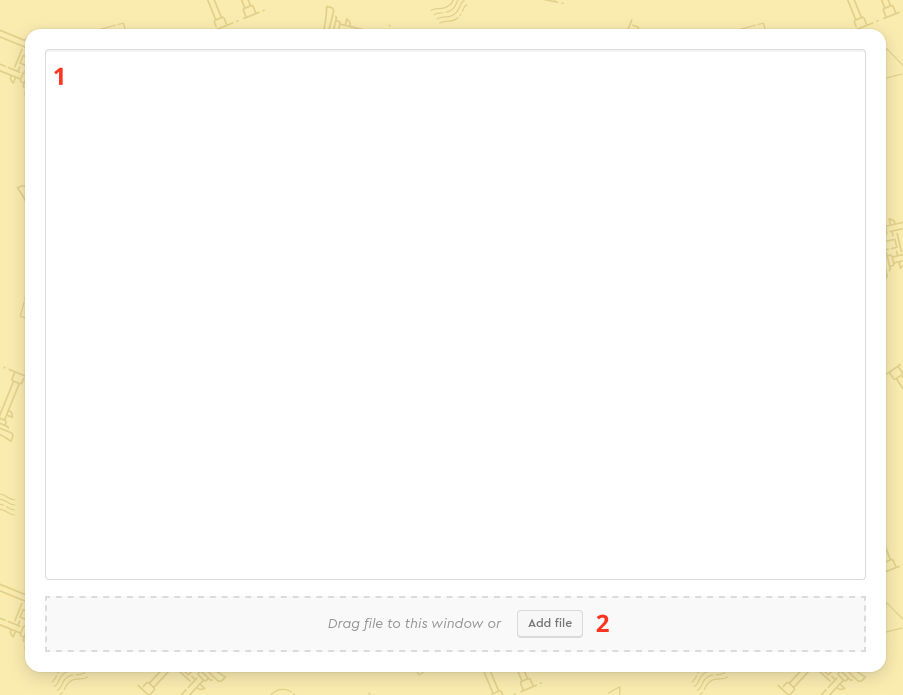
All encrypted content — both the message text and any attachments — is entered inside the Mailvelope iframe (1). Attachments can be added directly in the iframe using the "Add File (2)" function. The appearance of the iframe can be customized in the settings of the Mailvelope add-on, so you can always clearly see that it is a trusted source.
Except for adding an email signature, all standard functions of the email editor are available as usual.
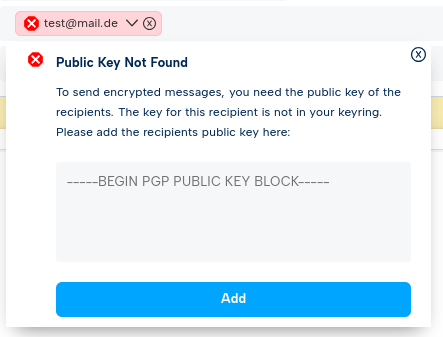
In addition to the usual checks on the recipient’s address (e.g., valid syntax), Mailvelope automatically verifies in the "To" or "Cc" field whether a public key exists for the given address. This key must either be stored in your private keyring or found on servers supported by Mailvelope. Only then is it ensured that the message is properly encrypted and readable by the recipient(s).
Note: If a public key cannot be found for one or more recipient addresses, you can either add it directly by clicking on the respective email address or in the add-on settings area to your keyring.
Additionally, while composing an encrypted message, Mailvelope may prompt you to enter the password for your private key. This occurs when your signature (digital signature) is required for automatic temporary saving of the message. If the password has not already been temporarily cached in the add-on from a previous action, you will need to enter it at this point.
The same applies when finally sending the email: if you click "Encrypt and Send", you may need to enter your password, unless it has already been temporarily cached in the add-on from a previous action.
Reading an Encrypted Email
In general, reading encrypted emails does not differ from reading unencrypted emails. We automatically detect whether an email is encrypted and, if so, display the Mailvelope iframe to show encrypted content. When opening the email directly, Mailvelope may prompt you to enter the password for your private key to decrypt the message. If the password has not already been temporarily cached in the add-on from a previous action, you will need to enter it at this point.
A special case arises with emails that contain both encrypted and unencrypted content. These are displayed unencrypted by default. However, a notice field is shown directly above the message content to inform you if encrypted content is present. You can then view the decrypted content in the same window following the instructions provided in the notice.

Replying to and Forwarding Encrypted Messages
Replying to and forwarding encrypted messages also works seamlessly:
- If you are in the compose window for a message, the encryption icon on the tab indicates that your reply or forward will also be encrypted. If the original message contains mixed content, the unencrypted parts are displayed normally and only protected after encryption when forwarded or replied to.
- In the message preview: an encrypted reply or forward is only automatically created if the original message consists entirely of encrypted content.